Having a simple, lightweight ointment for cuts and scrapes is super handy when backpacking, camping, or even just for home use. Having one that’s made with all-natural ingredients is even better!
I’ve recently found out that my Mt. Whitney trip this year is now official! So, come July, I’ll be backpacking with friends for a few days as we make our way up the tallest mountain in the contiguous United States.
As you may already know, my friends and I have been training to get our endurance up to speed, and along the way, we have come across situations where I stop and think “Hmm! It would be nice if I had brought X along for this”.
Case in point; our most recent trip was up on San Jacinto to test out our gear, and we could have used a bit of cut and scrape ointment to treat a few very minor yet annoying wounds.
So, for times when you’re out on the trail and just need a bit of healing balm for blisters or a scraped knuckle, look no further than this simple trail ointment recipe!
How to Make a Trail Ointment Recipe for Cuts and Scrapes
This recipe, like always, is really easy to throw together. I’m making enough for just one lip gloss tube, but you can certainly multiply the recipe to suit your needs.
Since I’m going for lightweight, one tube is definitely enough for the trails leading up to and including my Mt. Whitney trip.
Here’s what you’ll need to make my trail ointment recipe:
• An accurate kitchen scale like this one
• A flexible spatula
• One lip gloss tube like this one for easy application and storage
• A small Pyrex measuring cup or beaker
• A second small dish like this one for measuring out the Vitamin E
• A shot glass or similar to prop up the lip gloss tube to prevent spillage while pouring
• 4g beeswax
• 6g carrier oil (coconut oil or sweet almond oil are good choices)
• .5g Vitamin E oil
• 2 drops tea tree essential oil – highly anti-bacterial and anti-microbial making it perfect for wound care
• 2 drops lavender essential oil – speeds up the healing of cuts, scrapes, burns, abrasions, and other mild wounds
• 2 drops myrrh essential oil – helps stop bleeding, antiseptic, and anti-bacterial
• 1 drop helichrysum essential oil – helps stop bleeding, soothes pain, and helps keep wounds clean
Loving Preparation – Trail Ointment Recipe
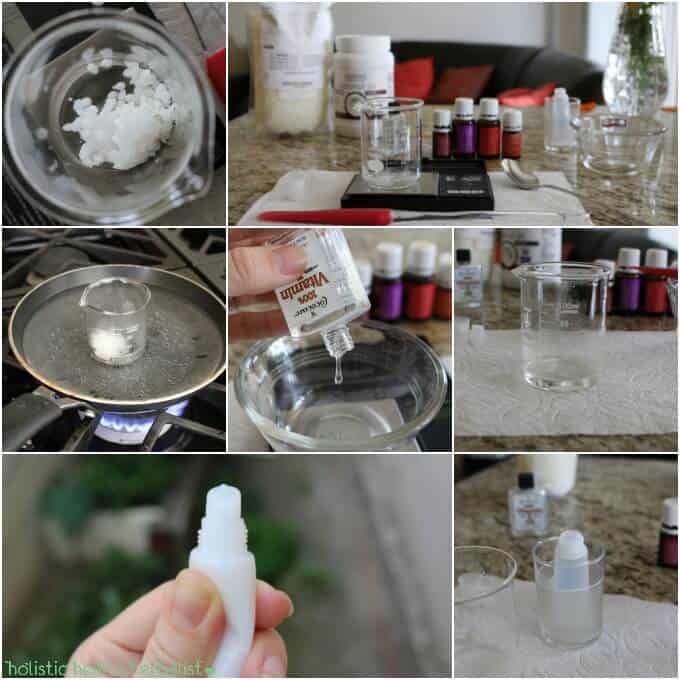
1. Bring one inch of water to a gentle simmer in a small saucepan.
2. While you wait for that, use the kitchen scale to measure out the beeswax and carrier oil into the small pyrex measuring cup/beaker.
3. Once the water has come to a simmer, place the pyrex in the center of the saucepan and allow the ingredients to melt completely.
4. In a separate small dish, measure out the Vitamin E oil.
5. Once the ingredients in the saucepan are melted through, remove the pyrex from the pan, wipe the bottom with a kitchen towel, and place it on the counter for a few minutes the cool slightly.
6. Next, add in the Vitamin E oil and the essential oils.
7. Stir to mix, then pour the mixture into the propped-up lip gloss tube.
8. Allow the mixture to cool, then cap closed.
To Use
I chose to put this homemade ointment in a lip gloss tube because it helps keep the product clean while out on the trail. I find that your hands, especially on multi-day trips, tent to get a bit grimier than usual so putting this in a tin wasn’t something I was too excited about. Using a lip gloss tube eliminates the need for sipping your fingers into the ointment to use it.
Instead, you can simply squeeze a bit out and apply it directly or to your finger for application.
Using a lip gloss tube also helps keeps everything contained so even if it melts, it won’t leak onto clothing or gear when packed away.
This ointment is great for all manner of cuts, scrapes, abrasions, burns, and more!
Have you ever made your own trail ointment? Please share in the comments below!
You may also enjoy reading:
DIY Hiker’s Calamine Lotion Stick
How to Prevent Altitude Sickness Using Natural Remedies
16 Natural Poison Ivy Treatments You Probably Have in Your Pantry
Homemade Bug Bite Balm

Leave a Reply